
Implementation of dynamic page navigation using slicer in Power BI
Power BI introduced a Navigation between pages through buttons in March 2020 updates.
Page Navigation allows you to navigate from one page to another within Power Bi Report.
Sometimes you may have multiple pages, and you do not want to go to each page and set a action property for each page for navigation, or you have a requirement to implement a functionality for user, where user will select a desired page from slicer and click on button for navigation to that selected page.
In this case you can implement a dynamic page navigation functionality, that allows to select desired page from slicer, and navigate to that selected page just on button click.
Lets see the implementation of Dynamic page navigation functionality using slicer, Page Navigation buttons in Power Bi.
Here we have a sample dataset named as Sales, just for demo purpose not taking a large dataset.

City Sales Status
| Hardiwar | 57547625 | ACTIVE |
| Delhi | 78956454 | ACTIVE |
| Gurgaon | 3575378 | INACTIVE |
| Haldwani | 4858378 | INACTIVE |
| Dehradoon | 43648 | INACTIVE |
| Roorkee | 36374584 | ACTIVE |
We have created a two pages in Power Bi desktop report as shown in below screenshot.
Report Page 1- Sales

Report Page 2- SalesByCityStatus

Now create a table that will have a page name that you have in report.
Go to Ribbon layout, Click on Home tab then, click on a Create a new table icon.

A Create Table Window Opens, Put all pages name in this table, Give a name to table as PageList and click on Load button.

Once you click on Load button, a PageList table is created in Power Bi desktop under fields pane.

Lets take a slicer on both pages – Sales , and SalesByCityStatus. Slicer is filled with a page name list.
Create a slicer on Sales Page

Create a slicer on SalesByCityStatus Page

Lets create a button, and set a action property for button that will take a page name for navigation on slicer selection.
Create a button on Sales Page

Once you click on Blank, You will see a blank button on report page, then set a formatting for button.
Give it a Name, go to button text property.

In similar way, create a button on Page – SalesByCityStatus.
Now, create a DAX, that will get a selected value (Page Name) from slicer.
Go to tables Sales, Right click on table name, and select New Measure.
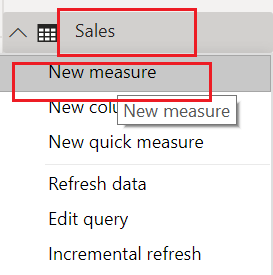
Now, write a DAX GetPageName that will get a selected page name from slicer.
GetPageName = SELECTEDVALUE(PageList[Page])


Once you click expression icon (fx) on Destination property, a Destination window opens.
Leave a Format By as it is to default value as Field value, For Based on Field , select a measure that you have created to get a page name from slicer that is GetPageName.
Now Click on Ok button.

Once you click on OK Button, you will notice that in Destination text box, an expression is selected that means value for destination is taken through an expression.

Now do the same steps on SalesByCityStatus page to setting up a button action property.
Now time to see it in action, Just select a SalesBycityStatus from slicer on Sales page, and click on button (CTRL + Click), You will see it navigates you on SalesByCityStatus page.
Again from SalesByCityStatus page, if you select a Sales value from Slicer, it navigates you on sales page.
![]()